In today’s AI-driven world, data engineers are focusing on eliminating manual processes and minimizing heavy lifting. The shift towards low-code or no-code solutions is gaining momentum, and visual ETL (Extract, Transform, Load) is at the forefront of this trend. AWS Glue Studio offers a powerful platform to perform visual ETL, making data transformation tasks simpler and more efficient.

Glue Visual Studio
AWS Glue Studio provides a user-friendly graphical interface that simplifies the process of creating, running, and monitoring data integration jobs. With its visual composition capabilities, you can design data transformation workflows with ease and seamlessly execute them on AWS Glue’s serverless, Apache Spark–based ETL engine.
In AWS Glue Studio, each node within the visual interface represents a specific function in an ETL pipeline. There are three main types of nodes: Source, Action, and Target.
- Source: This node establishes connections to data sources such as RDS, S3, SharePoint, Salesforce, and more.
- Action: This node allows you to apply business logic and write custom code to meet data transformation and analytics requirements.
- Target: This node loads the transformed data into the desired destination, such as S3, Redshift, Snowflake, or other supported storage solutions.
AWS Glue Studio offers a wide range of predefined transformations that can be easily applied using a drag-and-drop interface. However, if the required transformation isn’t available, you can use the “Custom Transform” node to write your PySpark code to implement the desired logic. The challenge is that custom transformations are created at the job level and are not designed for reusability, making it difficult to share or reuse them across different jobs or with other developers.
Custom Visual Transform
This is where the Custom Visual Transform comes in. It allows you to create a custom action node that performs the transformation and can be reused across multiple jobs and by different developers — without writing any code each time. With this feature, you can build a reusable library of action nodes that can be applied to various jobs, solving the reusability challenge and streamlining the development process.
Creating a Custom Visual Transform involves following specific steps to convert your custom code into a reusable visual component:
- Create a Configuration File: This file defines the structure and behavior of your custom visual transform, including input and output schema details.
- Write Custom Code: Implement the logic for your custom transformation using PySpark. This code will be the core of your custom action node.
- Upload to S3 Bucket: Store both the configuration file and custom code in an S3 bucket, which AWS Glue Studio will reference to make your custom transform available in the visual interface.
We will build a custom action node that masks personally identifiable information (PII) in our dataset. This is a common requirement when handling sensitive data, and creating a reusable custom visual transform will allow us to apply PII masking easily across multiple jobs.
Create a Configuration File
{
    "name": "custom_filter_state",
    "displayName": "Apply Masking",
    "description": "This state will perform masking for email and Phone columns",
    "functionName": "custom_filter_state",
    "parameters": [
       {
        "name": "colName",
        "displayName": "Name of the Column with Email",
        "type": "list",
        "listOptions":"column",
        "listType":"str",
        "description": "Name of the column in the data that holds the state postal code"
       }
      ]
}
The configuration file for a Custom Visual Transform is a JSON file that defines the UI elements and functionality for the masking node. Below are the key sections of the JSON file:
- Name: The system identifier for the transform.
- displayName:The name displayed in AWS Glue Studio’s visual editor.
- Description: A brief, searchable description in AWS Glue Studio.
- functionName:The Python function to be invoked in the script.
- Parameters: A list of input fields used for configuring the transform.
Within parameters, you have:
- name:The parameter name, passed as a named argument to the Python function. Follows Python variable naming rules.
- displayName:The label shown in the AWS Glue Studio editor for the parameter.
- Type: The data type of the parameter (e.g., string, list). In our example, it’s a list for selecting values.
- listOptions:A list of options to display in a Select or Multiselect UI, auto-populated with column names from the parent node’s schema.
- listType:Specifies the type of list (for type = ‘list’).
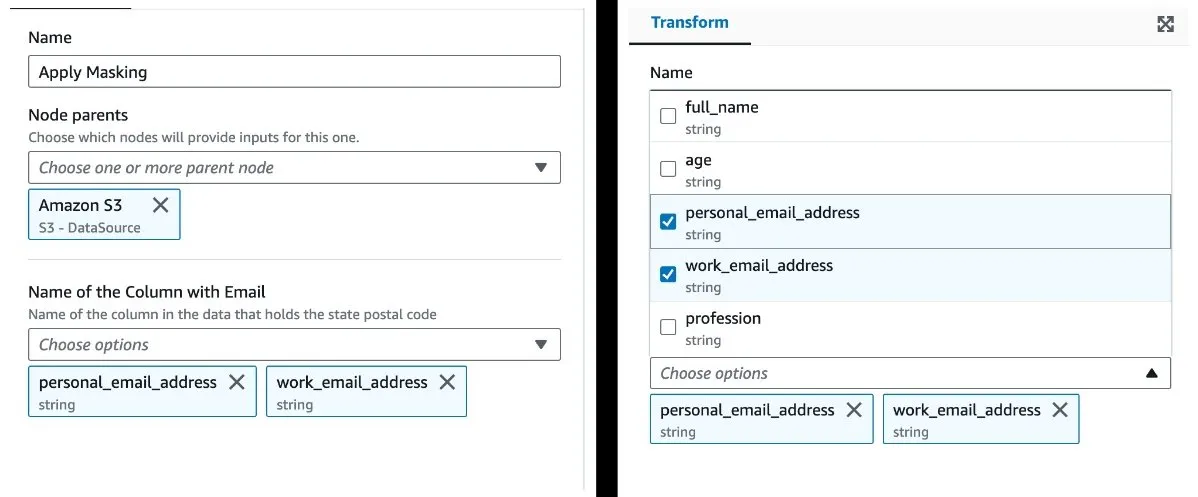
This configuration creates a node that retrieves all the column names from the parent schema and displays them in a multiselect dropdown. The user then has the option to select the PII fields that require masking. The resulting UI will look something like this:
Create the Custom Transform Code
from awsglue import DynamicFrame

def myTransform(self, email, phone, age=None, gender="",
                      country="", promotion=False):
   resulting_dynf = # do some transformation on self
   return resulting_dynf

DynamicFrame.myTransform = myTransform
The custom code for the Custom Visual Transform follows the structure where self refers to the DynamicFrame that needs to be transformed.
Parameter Naming:
- The parameter names in the code must match those defined in the config file.
- If a parameter is optional, provide a default value in the function.
Function Naming:
- Ensure the function name in the code matches the one defined in the config file.
- It’s advisable to ensure the function name and the name field in the config file are the same. This helps prevent any confusion between them.
Assigning Results:
- In the final line, assign the function’s results to the output in the config file.
- Always return the transformed result as a
DynamicFrame. - You can convert the
DynamicFrameinto aDataFrameif needed for further transformations using libraries likepandas,numpy,etc.
Below is the code that masks the columns selected by the user in the UI.
from awsglue import DynamicFrame
from pyspark.sql.functions import udf
from pyspark.sql.types import StringType
import re

# Define the masking function for email
def mask_email(email):
    if email and isinstance(email, str):
        return re.sub(r'(\w{2})(.*)(@.*)', r'\1***\3', email)
    return email

# Define the custom transformation
def custom_filter_state(self, colName):
    # Create UDF for Spark SQL
    mask_udf = udf(mask_email, StringType())

    # Convert DynamicFrame to DataFrame for transformation
    df = self.toDF()

    # Apply masking to each column in colName
    for col in colName:
        df = df.withColumn(col, mask_udf(df[col]))

    # Convert DataFrame back to DynamicFrame
    return DynamicFrame.fromDF(df, self.glue_ctx, self.name)

# Assign custom transformation to DynamicFrame class
DynamicFrame.custom_filter_state = custom_filter_state
Deploying Custom Visual Transforms
Save Configuration and Code Files:
- Save the configuration file
(mytransform.json)and the transformation code(mytransform.py). - Ensure both files share the same name to simplify the integration between the configuration and the code.
Upload to S3 Bucket:
- Upload both files to the specified S3 bucket location:
s3://aws-glue-assets-<accountid>-<region>/transforms/. - This S3 path makes the transform accessible for your AWS Glue jobs in that region and account.
Cross-Region and Cross-Account Reusability:
To reuse the transform across multiple AWS regions or accounts, you can:
- Manually replicate the configuration and code files across your accounts and regions.
- Leverage S3 automatic replication to synchronize your transforms for reusing across various environments.
End-to-End Pipeline Implementation
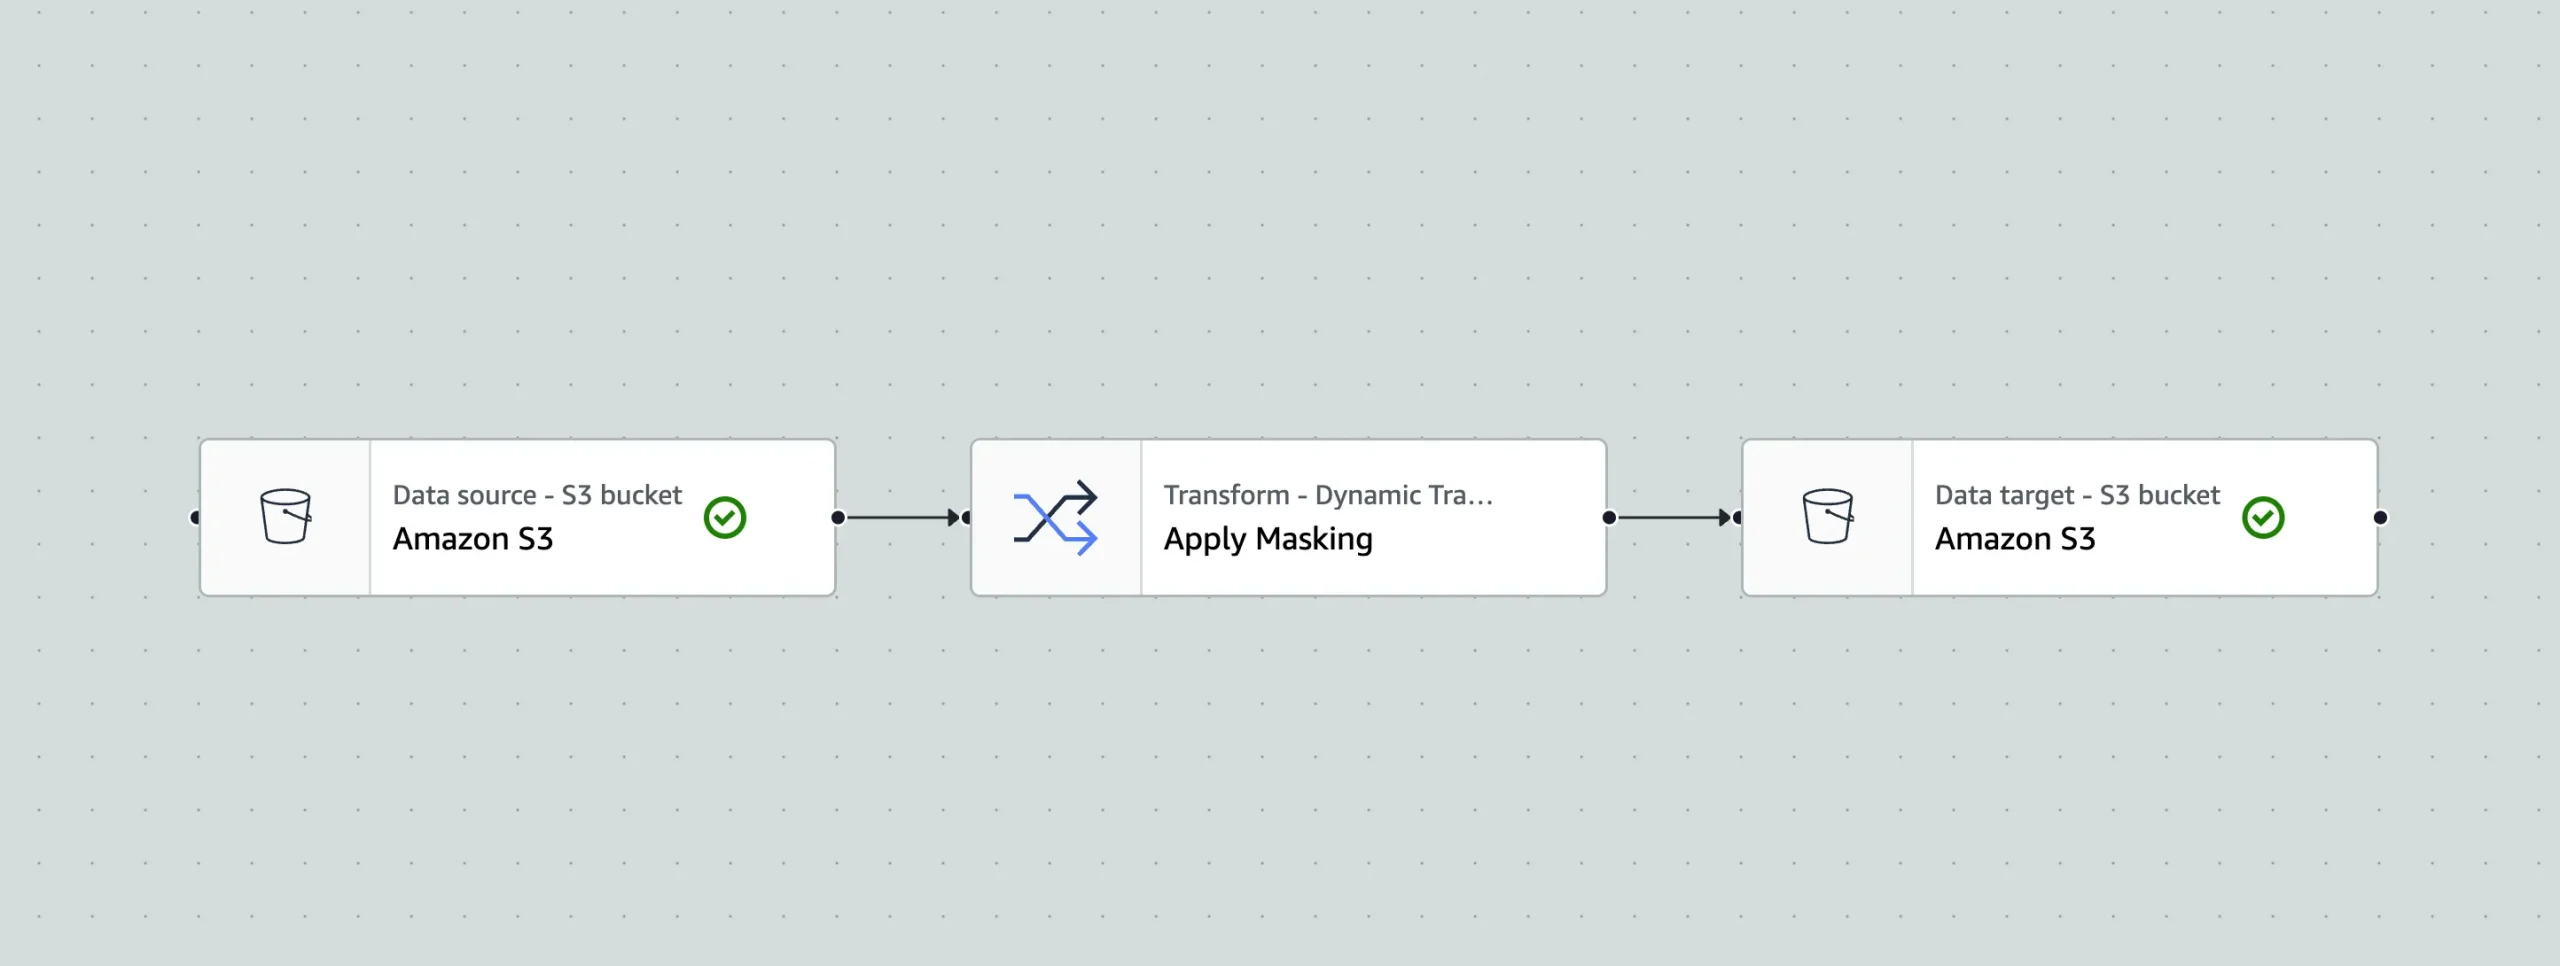
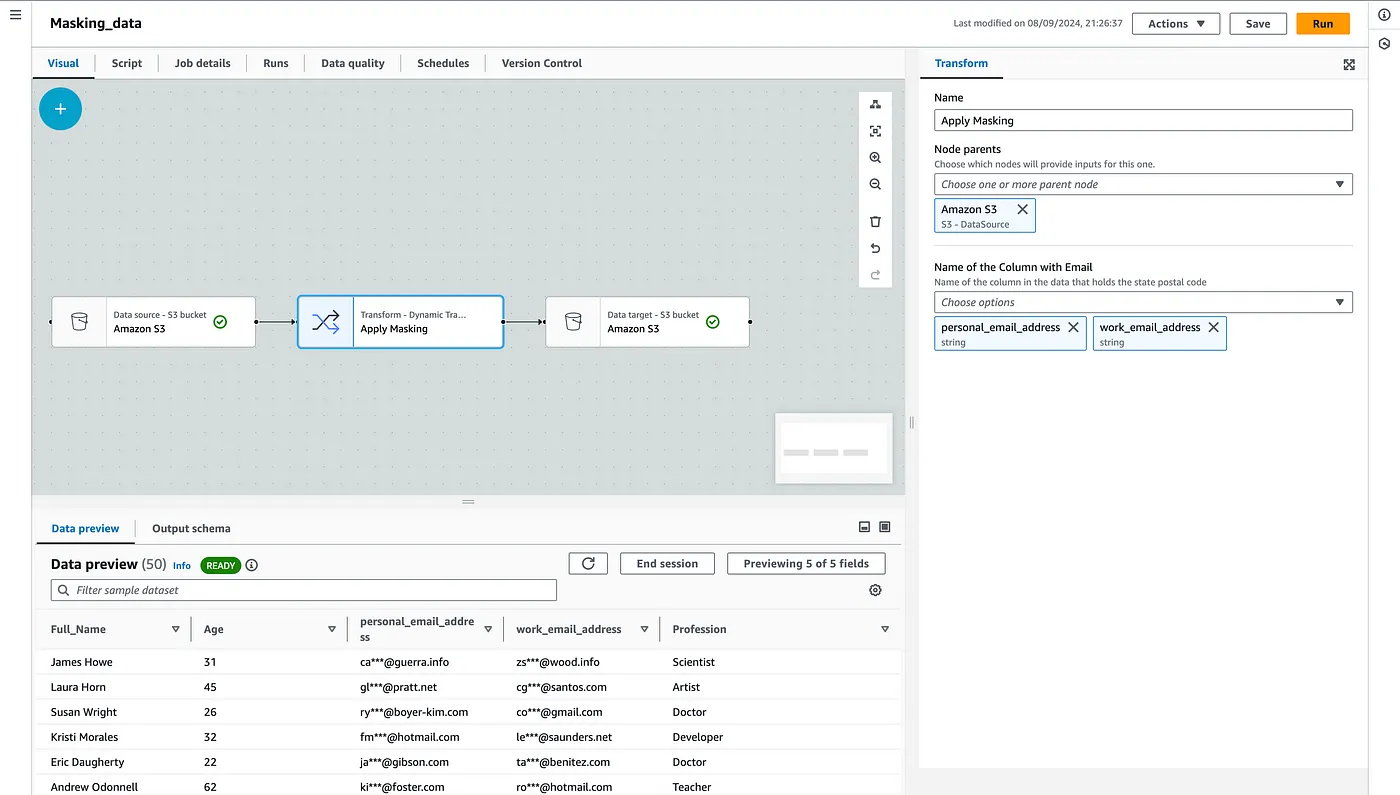
After uploading the required configuration and code files to the designated S3 bucket, your custom node will appear in the “Transforms” tab within AWS Glue Studio shortly. To demonstrate an end-to-end pipeline, consider a dataset containing two PII fields: personal_email_address and work_email_address. By selecting these fields in your custom masking node, AWS Glue will automatically apply the transformations. In the “Data Preview” tab, you can verify that the masking has been successfully applied. This process showcases how custom visual transforms enable seamless data transformations within the AWS Glue Studio environment.
Conclusion
By leveraging custom visual transforms in AWS Glue Studio, you can build specialized ETL transformations that fit your exact needs. The entire procedure is intended to improve and streamline data management tasks, from setting up configuration files to deploying the solution across regions. AWS Glue’s flexibility and scalability make it an excellent choice for building robust, automated data pipelines in the cloud.